|
Learn something new from my Photo Tips,
the tips will not only cover the use of Photoshop, but also include using your
camera and photographic philosophy.
Bookmark This Page
Quickly find a Photo
Tip by clicking on the Index below
Index

Number 45
Turning Professional
Imagine being able to
photograph what you want when you want with only yourself to please.
Added to this, if the light isn’t right on the day or if you decide the
subject is not what you want to photograph after all – you can just walk
away. These are the advantages of being an amateur photographer when
photography is for pure pleasure and for your own satisfaction.
Because amateur photographers get a lot of enjoyment from their hobby it
becomes a natural aspiration to want to earn their living from it and
turn professional. Let me very quickly say that the difference
between an amateur and professional photographer is not down to the
quality of their work – there are many amateur photographers who
consistently produce high quality images which outshine that of a
professional photographer. The difference is that a professional
photographer produces images to please someone else, the client, and
runs a business to earning a living from photography.
As a
professional photographer the business side takes over and becomes the
most important aspect – the majority of photographers are self-employed
and therefore responsible for running their own business. If you
are just relying on your talent as a photographer to earn a living at
it; chances are you will very quickly fail. You will be more
likely to succeed if you have a strong business acumen and learn just
enough photographic skills to get by with in your chosen field.
Please
don’t think I am trying to discourage anyone from wanting to become a
professional photographer as what can be more satisfying than earning a
living from a job you really enjoy. However, it does need treating
with a sense of reality and if photography ends up as a hobby rather
than a career it is possible to argue that an amateur has a better
outlook towards photography as they do it because they love it rather
than because they get paid for it!
Index
Number 44
Bridge – Photoshop’s
Undiscovered Secret
Bridge
often remains an undiscovered application with most users of Photoshop.
Available with Photoshop CS2 onwards, it is installed automatically and
can be accessed, with PC platforms, via Start > All Programmes >
Adobe Bridge or by clicking on the Br icon along the menu bar
in Photoshop (CS5).
Bridge
is an advanced file browser with the added advantage of being able
to preview all of your images – including RAW and PSD files without the
need to open them. This can save a lot of time – especially if you
have a large quantity of images to search through. It also enables
you to instantly view the Meta data to allow you to check camera
information and exposure details. Added to this it is possible to
rate images using the star system and run a batch of images as a slide
show.
Try it when you next use
Photoshop and it will revolutionize the way you browse and organize your
images.
Index
Number 43
Photoshop – Ask For Help
Have
you ever been in the situation where you are trying to do something in
Photoshop and find yourself needing some assistance? Then help is
always at hand via Photoshop’s Help function.
Photoshop’s Help provides a comprehensive guide to Photoshop’s features
and also includes tutorials and "how to" tips.
To
access the Help go to: Help > Photoshop Help or in Windows the
shortcut to it is F1. You can then look for what you want in the
table of contents, index or by typing a keyword into the search box.
Index
Number 42
Think Before You Delete
When
do you delete the image files from your memory cards? If it is after you
have just transferred them to your computer – you might even tick a “Delete
images from card when transferred” option in the transfer dialogue box. Have you considered what would happen if the files did not transfer
correctly or if there was a subsequent problem with your computer – you
could end up loosing all of these images.
A
better practice is to never use the “Delete images from card when
transferred” option in the transfer dialogue box and only delete the
images from the card when:
And
Once
you have confirmed that the files open and they have been backed-up –
then they can be deleted from the card. By doing this if the files do
not transfer correctly or your computer fails: you have either the files
on the original card or the back-up to fall back on.
Index
Number 41
Reduce Your Greens
Quite
often, in images that have been digitally captured, the greens can look
oversaturated which makes them look unnatural – this effect can be
exaggerated when the image is printed.
A
quick and easy way to correct this in Photoshop is to make an adjustment
using Hue/Saturation – ideally as an Adjustment layer. To
do this click on the Create a new adjustment layer in the layers pallet, the
icon looks like a diagonally split black and white circle, and select
Hue/Saturation from the menu. When the Hue / Saturation dialog
box is first opened you will find that the Edit is set to Master and
when the Saturation Slider is moved, the intensity of all the colours
will increase or decrease. However, it is also possible to
change the colours individually. This is simply done by clicking
on the Edit drop down box and changing the setting from Master to
Yellow –
note that to reduce the green in and image it is necessary to reduce the
yellow. Now reduce the saturation by moving the saturation slider
to the left until the desired effect is achieved.
This method will give you total control over how your greens
are rendered which will enable you to produce more natural looking
images.
For
more information on controlling colour saturation you can download the
worksheet below:
 Photoshop Colour Saturation (199kb)
Download
Photoshop Colour Saturation (199kb)
Download
Index
Number 40
Image Manipulation
In
this digital imaging age where virtually anything is possible and
anything goes, a lot of photographers are still adverse to image
manipulation. They cite any form of manipulation as cheating and that
everything should be done “in camera”. Up to a point this way of
thinking can be understood and respected as it leads to a very
disciplined way of image capture.
However, after this stage it does limit the photographer in the way the
final image looks in print or when projected. With the image captured
“as it was” and even if the conditions and light were perfect, it is
normally always the case that the image can still be visually improved
even if only the simple procedures of cropping, not all images suit the
3:2 or 4:3 ratio that most cameras give and can look stronger as a
panoramic or square image, and dodging and burning, where areas of the
image are selectively lightened and darkened to guide and hold the
viewers eye. These techniques have been used since the birth of
photography and are not new to the digital age.
Therefore, most images will benefit from even just a small amount of
manipulation: but, in reality, it is a matter for the individual
photographer to decide how much manipulation is needed depending on what
type of image he or she wishes to create.
Index
Number 39
Travel Light
When going out taking
pictures, do you go burdened down with all your kit?
Although it can be good to
have a wide range of equipment to choose from when out in the field,
sometimes it can get to the point where it can slow you down and
interfere with the picture taking process. If you are going out
with certain images in mind, why not jus take the equipment you are
likely to need. Having a limited choice of camera or lens to use
will focus your attention on the subject and enable you to be more
spontaneous towards it.
Henri Cartier Bresson, the
famous French photographer, took most of his images with a simple Leica
rangefinder camera and a 50mm lens. This would
allow him to walk the streets of Paris unobtrusively and unnoticed
looking for his "decisive moment".
Thinking along these lines
might help you to decide if you really need that new lens or other kit
you think you need as, if you are unlikely to take it with you, it will
probably be the case that you don't actually need it!
Index
Number 38
Use A Lens Hood
The answer to the question
as to when it is necessary to use a lens hood is a simple one – ALWAYS.
A lens hood will improve
the quality of your images by reducing the effect of flare. Flare
can come in two forms. The obvious one is when shooting into the
light and the flare is visible in the form of circular patterns running
away from the light source – normally the sun. Note that if the
light source is within the image frame it is unlikely that the lens hood
will stop the flare. Even when not shooting into the light,
indirect light hitting the front of the lens will dramatically reduce
the contrast of an image and a lens hood will prevent this from
happening.
As well as stopping flare,
the use of a lens hood will: shade the front element of the lens from
rain when shooting in inclement weather and also help prevent damage to
the front of the lens if it is accidentally knocked. In
conjunction with a lens hood a Skylight / UV filter is also recommended
to protect the front element of the lens.
Therefore the humble lens
hood should be regarded as one of the most important items in your
photographic kit.
Index
Number
37
The Ultimate Accessory
Are you still looking for
the ultimate camera, lens or accessory that will transform your images
and turn them into the ones you drool over in the magazines?
“If only I had a Canon 1Ds
MkIII with a 24mm f1.4 L lens”, then my images will be as good as the
landscape photographs spread over the pages of the photography
magazines, many photographers think to themselves. So you start
saving and while you are saving it will give you a chance to think of
what you are going to tell your wife when she finds out how much this
new kit cost - if she ever does!
The day comes when the new
kit arrives and you go off to the local beauty spot to capture some
images. You rush back home, full of excitement, and download your
latest masterpieces onto your computer preparing yourself to be gazing
at images similar to the ones you had been looking at in the magazines a
few weeks before – only to find out that your latest images look no
different to the ones you have been taking before.
What has happened – is the
equipment faulty?
Armed with the same amount
of photographic knowledge, the new kit is not what it takes to produce
better images. If you want to take better images then an increased
knowledge is what it takes to do this – with more knowledge will come
the realization that less kit is actually needed! Knowing the best
time of day and choosing a day when the lighting conditions are going to
be right for a landscape are more important than having the best camera
– when the conditions are right a compact will be good enough.
It is easy to get
preoccupied into thinking that to improve your photography you need to
buy something when, in reality, more knowledge is needed.
Therefore by investing in
knowledge, which can come from: enrolling on a course, one to one
tuition, or disciplined self- teaching, is the ultimate accessory
you can have to improve your photography.
The
Michael Anderson School of Photography has a course to help you get more
from your photography More
Index
Number 36
Telephoto Lenses & Shutter
Speeds
As
well as magnifying the image, a telephoto lens will also magnify any
signs of camera shake.
I have
seen a lot of potentially good images, taken with a telephoto lens which
has been hand held, which are unusable because they display signs of
camera shake.
The
way to avoid this is to use a shutter speed, when hand holding a camera,
of at least 1/125s or a shutter speed equal to the focal length of the
lens – which ever is the greater. i.e. 1/125s with a 50mm lens and
1/300s with a 300mm lens etc.
Lenses
and cameras which offer the advantage of image stabilization will allow
a slower shutter speed to be used. However, it will be necessary to
experiment to see how much the shutter speed can be reduced.
Index
Number 35
Use a Gorillapod
I’m
not normally one who buys an array of photographic gadgets and
accessories as most of them turn out to appear more useful than they
actually are in practice, and in the end rarely get used. However
I found an exception to this rule in the form of a Gorillapod.
It can
be used instead of a conventional tripod, but it is small and light and
can be easily slipped into most camera bags. It will not fully
take the place of a tripod, being much shorter, but it can be stood on
something to get more height or, because the legs can be bent into any
position, it is possible to attach it to trees, railings or posts to
give a secure mounting for your camera. It can also be used in
confined spaces and low to the ground where it will be difficult to use
a normal tripod.
Once you have used one it
will probable be an accessory you will not want to be without.
Index
Number 34
Photoshop - Upgrading
Is it worth upgrading
your current version of Photoshop as soon as the latest one comes out?
With a new version of
Photoshop being released about every 18 months, it is becoming an
expensive option to keep constantly upgrading. Although the new
versions offer more features it is a case of deciding if these will be
of benefit.
In reality Photoshop 7,
which came out in 2002, will offer all the features that are likely to
be used on a regular basis. And apart from Adobe Camera RAW (ACR)
successive versions only offered a few extra benefits that might or
might not be useful.
With the advent of
CS5 another milestone has been reached with the features it now offers
and these are ones that are likely to be constantly used:
- The most advanced
ACR converter to date which offers the facilities to reduce camera
noise and remove lens defects
- Complex selections
are now easy with the Refine Edges feature
- Difficult cloning
is now possible with the Content Aware fill
Most of the features
listed above will enable the photographer, or image maker, to carry out
tasks that would have been virtually impossible in previous versions
which make upgrading to Photoshop CS5 well worth considering.
The History of Photoshop
Index
Number 33
Take Images Not Photographs
I always like to refer
to a photograph as an image. Rather than using the word
“photograph” or “picture”, I feel that image is a better term.
The word image comes
from the word imagine and therefore rather than taking a photograph
which could be described as a record of what was there, an image
describes how the photographer imagined it to be and thus added his or
her interpretation to the scene.
Especially with the
advent of digital photography and the control that is available, it is
much easier to create a style that can be instantly recognizable as your
own and thus stamping your own mark on what you have created.
Index
Number 32
Make More Use Of Your Images
What do you do with your images once they have been taken and edited in
Photoshop – do they end up just sitting in a folder on your computer? If
this is the case, why not look at how they can be used and displayed.
With
modern digital printing methods it is quite easy, and relatively
inexpensive, to have them reproduced as canvas prints on in other styles
for display in your home or office. Other ways your images can be used
are in photo books – the process of choosing the images, deciding on the
running order, layout and perhaps adding a few words will help you
improve your visual awareness and get you thinking about what you are
trying to say with your photography. A simpler alternative would be to
have them reproduced as greeting cards which can be sent to family and
friends.
Why
not give one or some of these ideas a go as, not only will it give your
photography more direction, it will give you the satisfaction of being
able to enjoy the results.
Canvas Prints are available
from CanvasRus
Photo Books are available
from
YoPhoto
Index
Number 31
Give Your Photography Some
Direction
Whether you are just starting out in photography or have some
understanding, it is essential to have a direction. Rather than
just meandering about, a sense of direction will give your photography
more meaning and should help you improve along the way.
If you
are a beginner, why not enroll on a course? If there is not one close by or it is not convenient, then the Open
University offers an online course to teach you the basics
T189
Digital Photography. Once you have mastered these, you
could consider joining your local Camera
Club or becoming a member of the Royal
Photographic Society and going for a distinction.
What
ever path you choose having a direction will make your photography more satisfying and
rewarding.
Index
Number 30
Take
Time To Select
One of the most important stages of the photographic process, and often
the most overlooked, is the process of selection. With the advent
of digital photography it is easy to take hundreds if not thousands of
images. But what thought is given to going through them all to
select the best?
Rather
than selecting a few obvious ones, it is better to have a process where
all the images are looked at and evaluated. This should include
selecting the best version of similar images and, if telling a story or
producing a panel, select the ones that as a group will convey the
message. During this process consideration should also be made to
cropping as this simple procedure can transform an image, for example:
cropping down unnecessary sky and foreground in a landscape to turning
it into a striking panoramic.
Once
this selection process has been done, the images can be processed in
Photoshop with the knowledge that the best ones are being worked on.
Index
Number 29
Photoshop Soft-Proofing
Introduction
Soft-Proofing is a facility in the full version of Photoshop which allows the simulation on screen
of what the printed version
of the image is likely to look like. It should therefore be part the
Colour Management workflow.
To get
the best out of the Soft-Proofing it is important to have a calibrated
monitor and the ICC Profile for the printer, ink and paper that is going
to be used to produce the print. If the print is going to be produced by
a photographic laboratory they will be able to supply the ICC Profile
they use to enable you to Soft-Proof the image before it is sent away
for printing.
Even
with a calibrated monitor the image will always look different to the
printed version because the monitor image is produced by transmitted
light and the print viewed by reflected light. What Soft Proofing will
do is to try and address this difference.
Soft-Proofing In Practice
The
time to Soft Proof is when the image has been processed in Photoshop,
but before it is printed.
To set
up Photoshop to Soft-Proof go to View > Proof Setup > Custom
And
fill in the dialogue box as follows:
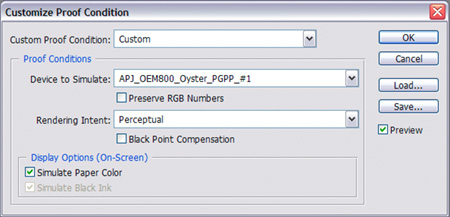
Under
Device to Simulate select the ICC Profile that will be used for printing
- Preserve RGB
Numbers must be unticked
- Rendering Intent
should be set to Perceptual – also see note below
- Black Point
Compensation should be unticked – also see note below
- Simulate Paper
colour should be ticked. Note that when this box is ticked the
Simulate Black Ink box will become greyed out and can be ignored
If Gamut Warning is
ticked from the View Menu a warning will be displayed for the colours
that are out of range for the printer. These colours will be corrected
by the chosen Rendering Intent – also see note below.
Once OK is clicked the
image displayed on the monitor will take on the appearance of the
printed version. If the image is acceptable then the image can go to
print, otherwise further adjustments in Photoshop are needed.
If comparing the printed
image to the monitor, it is important that the light source to view the
print is either true daylight, a daylight bulb or daylight corrected
light source. If the print is viewed under an uncorrected tungsten light
or fluorescent light source the colour balance of the print will be
affected and a direct compassion cannot be made.
A Note on
Rendering Intent
The Rendering Intent
will tell the printer, via Photoshop, how to reproduce the out of gamut
colours. These are certain colours the monitor can display but beyond
the range that can be reproduced by the printer.
There are four rendering
intents to choose from but only Perceptual and Relative Colorimetric are
suitable for photographic use. The recommended one to use for most
situations is Perceptual – unless following any manufacturer’s
instructions on using their profiles, in which case, use the Rendering
Intent advised.
A Note on
Black Point Compensation
Black Point Compensation
will tell Photoshop how to re-align the blacks between different colour
spaces and profiles. There are no set rules on its use but, it is
generally accepted, is best to leave it unticked unless following any
specific instructions, or if converting from RGB to CMYK colour spaces.
You
can download the PDF version below
Photoshop Soft-Proofing (386kb)
Download
Index
Number 28
Using A Digital Compact Camera
Introduction
Whether you are using a Digital Compact Camera to record family, friends
and holidays or you are an experienced photographer wanting a small
camera for convenience. It is worth following a few guide lines to help
you get the best from it.
Advantages
Digital Compact Cameras are convenient and easy to carry and have some
advantages over a Digital SLR (DSLR):
- Very little
photographic knowledge required to use it
- It is possible to
take pictures without attracting attention
- Images have a large
depth of field
Limitations
To get the best from this
type of camera it is important to work within the camera’s limitations
which are:
- Because of the
small sensor size, image quality can be poor at high ISO settings
and therefore are best avoided unless absolutely necessary in low
light conditions
- Although most have
a telephoto lens, it is not usually long enough or of the quality
for types of photography where long lenses are the norm as with
sport or wildlife photography
- Digital Compact
Cameras have the facility to shoot continually, normally referred to
as burst speed, however they cannot compete with the frame rate of a
DSLR
Therefore as long as you do not need to take pictures in low light, of
distant subjects or fast moving subjects then a Digital Compact Camera
is capable of producing excellent results.
Because a Digital Compact Camera has a smaller sensor than a DSLR the
image quality will not be as good. However this does not mean they
cannot produce good photographs as, good photographs are about visual
effect rather than image quality.
Getting
the Best Results
If
your photographic knowledge is limited it will be better to avoid the
more advanced settings and let the camera do the work; because in most
situations the camera will be able interpret the situation. However in
certain situations having a little knowledge can enable you to take good
images in situations where the camera can be fooled.
You
can download the PDF version below which also includes a six step guide to
better photography with a compact
Using A Digital Compact Camera (295kb)
Download
Index
Number 27
Photoshop - Keep It Simple
Photoshop is a complex application and there are often several ways to
achieve the same process. This can make it difficult for the beginner
as after a while it all starts to become confusing. Therefore when
starting out it is better to learn a few simple steps that are likely to
be used repeatedly – this repetition will also help to reinforce the
understanding. And once confidence is gained, then go on to learn a few
more advanced techniques which might not be used as often.
Some of
the essential processes to have an understanding of:
In
reality if you do not want to carry out a lot of manipulation to an
image, and I have found that a lot of people don’t, then the above
processes should cover most of what is needed.
Index
Number 26
Photoshop - What It Cannot Do
It is
possible to do just about everything in Photoshop: if you can imagine it
– chances are it's possible to do it! However there are two things
Photoshop cannot do:
Make an
unsharp image sharp
Even
using Unsharp Mask, or any of the other sharpening filters, it is
impossible to make an unsharp image sharp. What the filters will
do is improve the definition of an already sharp image - to give it an
extra edge. Therefore take care in capturing an image to ensure it
is going to be sharp. Not only can incorrect focusing cause
blurred images, so can subject movement and camera shake.
See my
Worksheets for more
details on Unsharp Mask
Recover
highlight details
Once
the highlight details have been lost it is impossible to get them back.
Therefore if the scene contains very bright areas or has a wide contrast
it will be necessary to underexpose. See my
May 2008 Monthly Photo Tip.
Index
Number
25
Prime
Standard
There was a time
when all 35mm SLRs came with a 50mm prime standard lens, now a zoom is
the norm.
Although a zoom can
be versatile and convenient, it can make you lazy as it is all too easy
to take a picture from the spot where the subject is first seen and then
use the zoom so it fills the frame.
With a prime
standard lens you have to move about to frame the subject, which
encourages you to explore the situation – to get the very best
composition. Added to this these lenses are more compact, have a
faster aperture and can produce sharper images.
Why not give one a
try!
Index
Number 24
Curves in Photoshop Elements
Curves
are a useful feature in the full version of Photoshop which is seemingly
missing from Photoshop Elements. However, from Elements 5 onwards, there
is a version of curves if you know where to look:
Enhance >
Adjust Colour > Colour Curves
Don’t
be confused by the word colour as the Curves have the same effect as the
Photoshop version. The main difference is: rather than being able to pull
on the Curve’s line in the graph directly, the Curves are adjusted by a
series of sliders. Although the adjustment is not as intuitive, is soon
becomes easy with practice.
For
advice on how to use Curves you can download the Worksheet below:
Photoshop
Curves Adjustment (426kb)
Download
Index
Number 23
Bit Depth
Confused by the term Bit Depth? An image file can have a bit
depth of either 8 or 16. If you are capturing your images as a
JPEG, then you are limited to just 8 bit. However, if using RAW,
the 16 bit option becomes available.
What is the advantage? A 16 bit file contains a greater amount
of colour and tonal information - 32,769 colours compared to 256 of an 8
bit file. In reality though, most of this advantage will be
restricted because of the limitation of the colour gamut and therefore a
16 bit file cannot display any more colours than an 8 bit file.
Why
use a 16 bit file then? The big advantage of using a 16 bit file is
if you want to manipulate it. A 16 bit file can be manipulated to
a greater degree without the colours and tones degrading or blocking.
The resulting image will have smother tones and better graduations.
It is possible to tell if tonal and colour information has been lost
during manipulation by looking at the histogram – it will display a comb
effect showing gaps in the information.
To
Summarize – an 8 bit / JPEG file will be fine if you don't intend to
carry out any major manipulation on it. However, the best option
will be to capture in 16 bit / RAW if you intend to carry out a high
degree of manipulation.
Index
Number 22
Digital Camera Colour Space
Most digital cameras
have the option to select a working Colour Space. The choice is
between sRGB, which is normally always the default, and Adobe
RGB.
If you want to get
the best from your camera it is recommended that the Adobe RGB Colour
Space is used. This is because it supports a larger colour range
(gamut) especially in the cyan to green range of the spectrum.
With the camera set
to Adobe RGB, it is also important to use this Colour Space in Photoshop
as well - see my June 2008 Monthly Photo Tip.
Using this Colour
Space will mean that your images will be optimized for printing to give
you the best possible colour range. However, If you intend
to digitally project the image or use it on the web, then it will be
necessary to convert it to the sRGB colour space. This is easily
done in Photoshop by opening up the image and following the path:
Edit > Convert To
Profile choose sRGB from the drop down box as the
Destination Space Profile and click OK
Index
Number 21
My 15 Minute Rule
When I first open up
an image in Photoshop I give myself 15 minutes to check to see if
it is worth taking any further.
I check the
sharpness by examining it at 100% image size. Then, in Levels, I make sure it has
both shadow and highlight detail (see my December 2007 Photo Tip below).
I also adjust the Curves and Colour to confirm I can get them working
how I want.
If the image passes
all of these tests I will spend more time on it - if not it heads for
the Recycle Bin!
Index
Number 20
The Sunny 16 Rule
Even if you
rely on your camera's metering system to work out the exposure for you, it
is still worth remembering the Sunny 16 Rule. This will give an idea of what settings the camera will be using and therefore what ISO to
set.
The
Sunny 16 rule means that on a sunny day when using a shutter speed
approximately to the same value as the ISO setting: i.e. 1/125s for ISO 100 the
aperture to give the correct exposure will be F16. Further on from
this it becomes quite easy to work out the exposure for other conditions:
- F11 - Sunny with
hazy cloud
- F8 - Overcast but
still bright
Therefore, using this rule with
a digital camera, if
it is overcast but still bright and a fast shutter speed is needed to freeze
the action - set the ISO to 400, the shutter speed to 1/500s
and the aperture to give the correct exposure will be F8.
Index
Number 19
Try Different Papers
There is a wide
variety of papers available now including: resin coated inkjet papers,
fiber based papers that have the quality and feel of traditional
darkroom papers and art papers which have the characteristics of an
artists watercolour paper.
Try using a paper
that is suited to the image: resin coated paper for your contemporary
images, fiber based papers for monochrome work and art papers for an
impressionistic feel.
Using a ICC profile,
see my April photo tip, it is possible to use different papers and
still achieve an accurate colour balance between them.
Index
Number 18
Print Using A Profile
Once the screen has been
calibrated (see my February and March tips), do you want your
print to match it? If you do then the next stage in colour management
is to print using an ICC Profile.
Described simply, an ICC
Profile is a code that will enable the correct colours to be printed
with a particular paper, ink and printer combination.
PermaJet are one paper
manufacturer that provides ICC Profiles for all their papers - PermaJet is the
paper I use myself. Their website gives further details on how to use
them. See my Links page for the
PermaJet website.
Index
Number 17
Check Your Screen's
Brightness
If you don't want
the expense of buying a Spyder, there is an easy way to check the
brightness of your screen using a camera. Along with colour
balance and contrast, the brightness plays a major part in how images are displayed on
a screen.
Just follow these
steps:
- In Photoshop create
a new white (R255 G255 B255) A4 document in landscape format and
make it as large as possible on the screen.
- Now using your
camera in aperture priority mode, set it to an ISO of 100 and a
shutter speed of 1/15s. Now point it at the screen so that the
white area fills the frame.
- If the brightness
is correct the aperture should read F8. If it doesn't adjust
the brightness of the screen: if the aperture is higher than F8 the
screen is too bright - if lower too dim.
Remember that the ambient
light in the room will make a big difference to how the screen looks.
Therefore it is always best to keep the ambient light as low as possible
when working at the screen and carrying out this test.
Index
Number 16
Monitor Calibration
A calibrated monitor
is the starting point for reproducing colours and tones accurately (colour
management).
Having a calibrated
monitor will enable you to evaluate how the image will
appear when it is displayed on another device or printed out.
The best way to
calibrate a monitor is to use one of the calibration aids, e.g.
Datacolor Spyder, available.
The initial expense will soon be regained in the time and money
saved when prints match what is on the monitor.

If you cannot see all 21
steps in the grey scale above your monitor probably needs calibrating
Index
Number 15
Photoshop Quick Tips
Marquee Tool
When
using the Marquee tool and holding down the "Shift" key with the
Rectangular or Elliptical options will enable a perfect
square or circle to be maintained.
Crop
Tool
By holding down the
"Ctrl" key when using the Crop tool it will be possible to crop close to the edge of
the image without the tool snapping to the document bounds.
Move Tool
When moving
a selection or layer from one image and it needs to be in the centre of
the new one; just hold down the "Shift" key while making the move.
Index
Number 14
Photoshop or Elements?
Do I
need the full Photoshop or will Elements do what I want is a frequently
asked question.
Without
a doubt Photoshop is the best image manipulation package available and
is a
must for anyone working in the industry. It is well supported with
the various plug-ins and how to use guides available.
However, the price
can be too much for the casual user.
Elements is a simplified version available at a fraction of the cost of
the full Photoshop. It is still a very powerful program but lacks
certain features - most of which will only be used by designers.
The main missing features which are useful to the enthusiast
photographer are: Channels,
Curves and Layer Masks. However, there is a version of Curves available
from Elements 5 - see my Photo Tip Number 24.
Therefore if you
want the best go for the full Photoshop, or if you want the best
value for money then Elements is for you.
* Update - Layer
Masks are available in the new Elements 9 *
Index
Number 13
Come Back To An
Image Afresh
After
working on an image in Photoshop, it is often wise to come back to it
another day before deciding that you have made the best of it.
Just
like trying to proof read your own writing after it has been written: it
is normally much harder to spot any errors. But by coming back to it
afresh it is much easier to see any imperfections or change anything
which, on reflection, can be improved on.
The
same goes for images as well and by doing this you will come closer to
making the best of them.
Index
Number 12
Raw
Conversion
If you are using an older
version of Photoshop that does not support the Raw files from your
latest Digital Camera, it is possible to download the Adobe Digital
Negative Converter which will convert them into a .dng file that will be
supported.
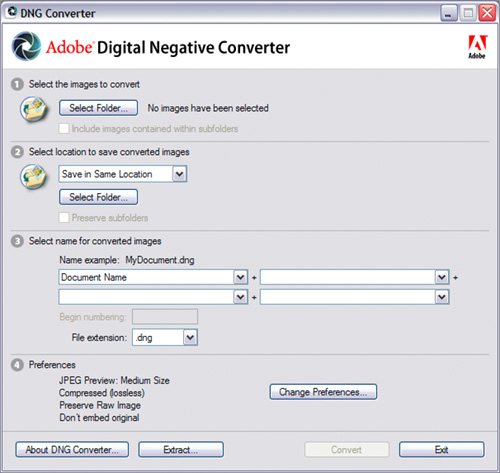
Version 5.3 can be downloaded from:
http://www.adobe.com/support/downloads/detail.jsp?ftpID=4369
You will also find a full
list of supported cameras and instructions on how to use it.
Index
Number 11
Six Point Check Before
Using Your Digital Camera
Before using your
Digital Camera take time to check the following - this way it will
always be on the correct settings:
Battery
- Fully charged
ISO
- Set for the expected lighting conditions
File
Size & Type - Generally set to the best quality
White
Balance - Adjusted for the expected light type
Mode
- Aperture Priority / Shutter Speed Priority etc
Compensation
- Exposure Compensation set to underexpose*
*To help preserve
the details in the highlight areas - I always underexpose by 0.7 of a
stop
And, if you need an easy way
to remember this, just think of:
Bring
Into
Focus
With
My
Camera
Index
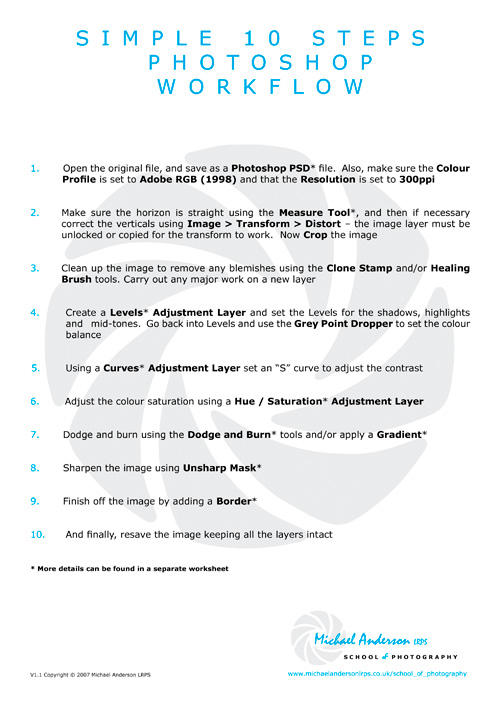
Number 10
Photoshop Simple Workflow
An important factor
of using Photoshop is workflow – having a routine and order for the
various stages of processing: some of which can be personal preference,
some more practical. A set routine will greatly improve your
control and efficiency while working with Photoshop. This is the
Simple Workflow I use to process my images:
You
can download the PDF version below
Photoshop Simple Workflow (51kb)
Download
More
worksheets can be downloaded on my
Worksheet page
Index
Number 9
Avoid
The First Shot You See
Rather than taking the
first shot you see - take time to explore the situation.
It's all too easy to take
the first shot you see when you walk up to a new subject - certainly
take the picture if the situation or light is going to change -
otherwise take time to explore the situation to get the best shot
possible.
Index
Number 8
Photoshop Colour Settings
Are you using the correct
Colour Settings in Photoshop?
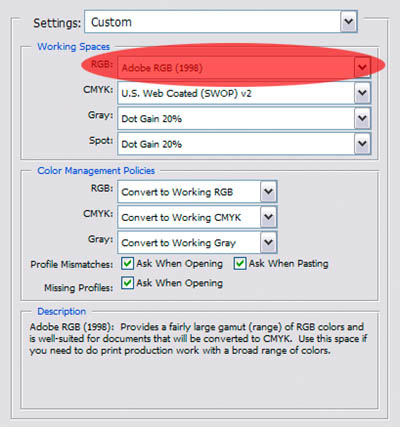
The Colour Settings are
important because they determine the range of colours that will be
reproduced in the final output.
Images to be printed should
be produced in the Adobe RGB (1998) Work Space as it will provide a wide
range of colours.
Whereas, images that will
be used on the web or digitally projected should be produced in the sRGB
IEC61966-2.1 Work Space as this reflects the more limited range of
colours which can be produced by a computer monitor or digital projector.
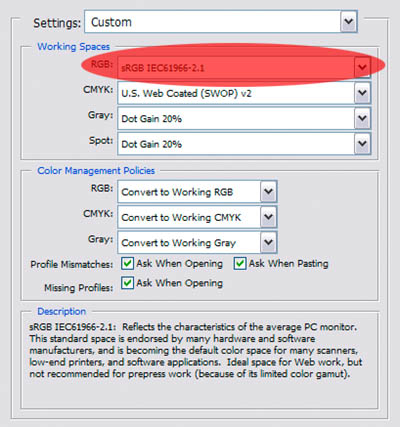
You
will find the Colour Settings by following the path:
Edit >
Colour Settings
Then in Working Spaces Select
the required RGB setting from the drop down menu.
Under
Colour Management Policies, in RGB check that Convert to
Working RGB is selected. If the Profile Mismatches and
Missing Profiles boxes are ticked you will then get a warning if
there is a profile mismatch when opening up an image.
These instructions can be found on
the Worksheet below
Photoshop CS2 Preferences & Colour Settings
(200kb)
Download
More
Worksheets can be found on my Photoshop page
Index
Number 7
Underexpose
With a digital camera, to
help preserve
the details in the highlights, I underexpose by either .3 or .7 of a
stop or sometimes slightly more depending on the contrast of the scene -
the more the contrast the more the degree of underexposure.
The resulting images will be on the
dark side, but the mid-tones and shadows are easily corrected by
adjusting the "levels" in Photoshop. This technique can be used
with any digital camera, because digital cameras are much better at
handling the shadows than they are the highlights, and once the highlight
details have been lost it is impossible to bring them back.
Index
Number 6
Photoshop "Rule of Thirds" Grid
The grid in Photoshop can
be set up to give a useful "Rule of Thirds" Grid to check the
composition of your images.

To
set it up follow the path:
Edit >
Preferences > Guide, Grid & Slices
Enter 33.3 in the
Gridline every box then select percent as the unit of measure
and enter 1 in the subdivisions box
Use
the shortcut Ctrl and ' to turn it on and off
These instructions can be found on
the Worksheet below:
Photoshop CS2 Preferences & Colour Settings
(200kb)
Download
More
Worksheets can be found on my Photoshop page
Index
Number 4
Use a
Monopod
I often use a monopod for
my landscape photography because:
- It enables me
to keep the view framed while waiting for the light to change
- I can use a shutter
speed of at least one stop, if not two stops, lower with the
confidence that I will not get any camera shake
And remember, a monopod is
a lot easier to carry that a tripod and will double as a walking pole
Index
Number 3
Photoshop's Notes Tool
Photoshop has a very useful Notes Tool. By using it you will never
forget how something was done.

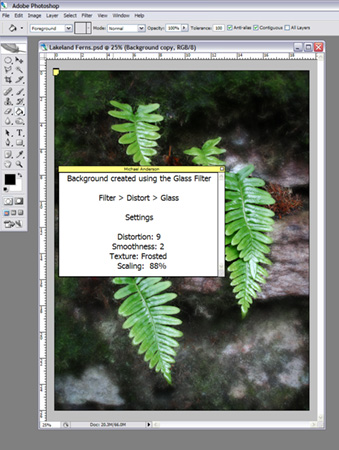
It can be found just above the Hand Tool and the Notes can be turned on and
off by: View > Show > Annotations
See the finished version in my Lakeland
Gallery
Index
Number 2
Back-up Your Data
You might think it will not happen to you, but it is always a possibility
that you could loose all your data:
But,
by backing-up the data on your hard drive on to an external hard drive and
keeping it separate from your main computer, preferably in a fire safe, the risk
will be kept to a minimum.
Index
Number 1
Highlights & Shadows
To reveal any burnt out highlight and blocked shadow areas in an image:
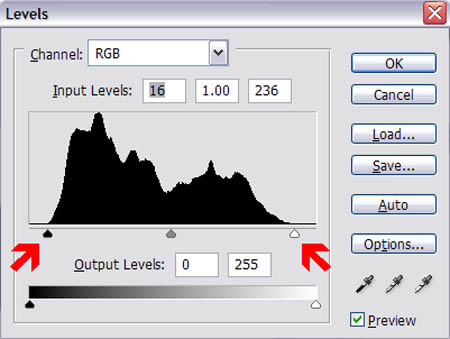
Just hold down the "Alt" key while adjusting the highlight and shadow sliders
in Photoshop's levels.
Index

The
Michael Anderson School of Photography has a course to help you get more
from your photography More
|